Choosing the Right Flowers for Pressing
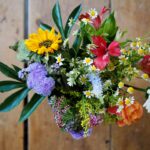
As a nature lover, understanding how to select suitable flowers for pressing is vital in creating lovely pressed flower art. Not only does it help in reducing our impact on nature, it also brings the added benefit of creating beautiful arts and crafts. The art of flower pressing embraces many flower species, but some are simply better suited for this process than others. As a guideline, consider choosing flat-faced flowers with a single layer of petals, like roses and pansies. These flowers press more easily due to their simple structure, as advised by the experts at Country Living.
When collecting these flowers, remember to minimize harm to the natural surroundings. Try to pick flowers gently and in moderation to prevent unnecessary damage to the plant. The best time to collect flowers is on a dry day, preferably in the morning after the dew has evaporated. By following this advice, beginners to flower pressing can start their journey with confidence.
Tools and Materials Required
Next, let’s review the essential tools and materials needed for pressing flowers. To begin, basics such as scissors for cutting the stems and glue for assembling your final work are a must. For the actual pressing, choose a heavy book or buy a specialized press. Both options are equally effective, it’s just a matter of personal preference.
Once your flowers are dry and pressed, you will need Mod Podge for sealing, preserving your flower’s vibrant colors. You’ll also need a paintbrush for applying the sealer. These materials are essential to the process and are readily available as outlined by Green Matters. Having these tools and materials ready ensures that the pressing process goes smoothly.
Step-by-Step Guide on How to Dry and Press Flowers
Great, now that you have your tools ready and flowers picked, it’s time to start drying and pressing. Remember, the method used will slightly alter the final appearance of the flower. There’s no right or wrong here, it all depends on your personal preference and the result you’re seeking. You may choose the traditional method of pressing in a book, the quicker method using an iron, or even the fastest route – using the microwave.
Each of these techniques has its unique benefits and drawbacks. Your ultimate decision would depend on considerations such as the fragility of the flower species, the time you have available, and the equipment at your disposal, all of which are excellently covered by both Country Living and Green Matters.
Preserving and Displaying Pressed Flowers
After your flowers have been pressed and dried, the next step is preservation. The process of sealing your flowers helps maintain their color and keeps them vibrant for years to come. Properly preserved and stored, a pressed flower can hold its color for about five to seven years, according to Country Living.
Once your flowers are preserved, you may want to display them. Framed pressed flower art makes for an excellent decorative piece. For best results, opt for UV-resistant frames to protect your art from sun damage.
Creative Ideas for Using Pressed Flowers
Let’s not stop at just framing your flowers. Pressed flowers offer vast potential for creativity beyond being a decorative piece. You can involve these beautiful pieces in handmade gifts like bookmarks, greeting cards, or even jewelry. These DIY project ideas not only promote creativity and personal expression but also are an eco-friendly way to gift something personal and unique. Both Country Living and Green Matters are fantastic sources for such DIY inspirations as you delve further into the world of pressed flowers.